Console apps: Above and beyond
What are console apps?
Console apps are, as the name suggests, applications that run in a console. That is any command-line interface (CLI) that can serve as an output for such an application.
In Windows, these are the Command Prompt (CMD), PowerShell (PS), and – optionally – Windows Terminal (WT).
Console apps, in contrast to applications with graphical user interfaces (GUIs), in general, do not support the use of a mouse but instead focus solely on keyboard usage.
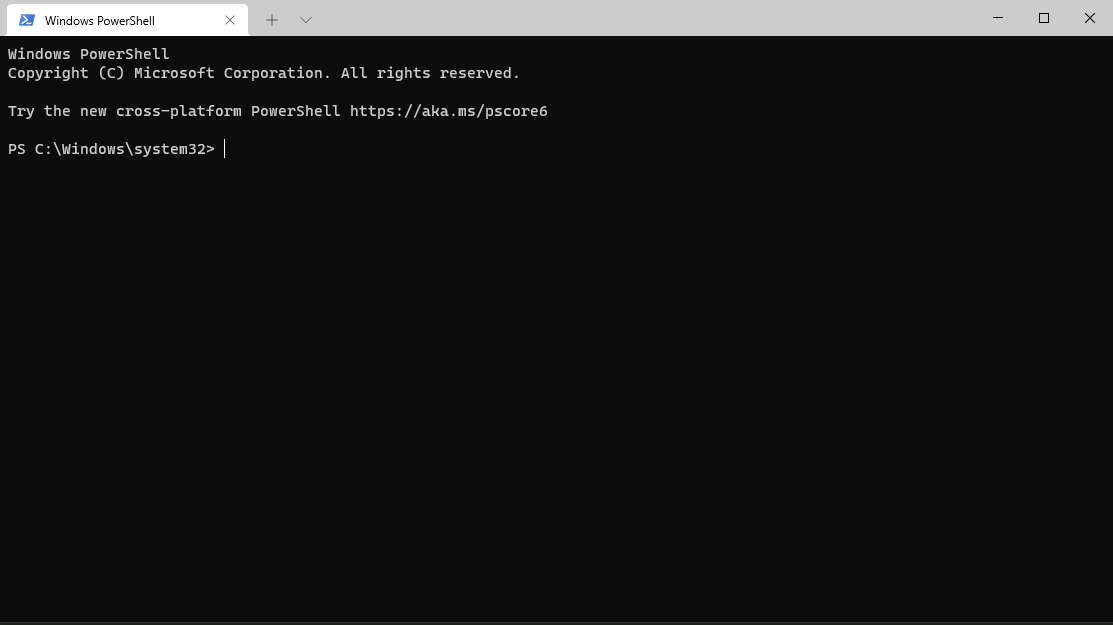
Your best friend.
Console apps are the easiest way to create an application with very little overhead, since most modern programming language frameworks offer support for creating them. Besides, the complexity of a simple console app is often a lot lower than a GUI-based application of the same functionality, and makes it much easier to create an easily accessible API by calling the console app through a CLI from another application.
How do .NET console apps work?
The .NET ecosystem allows for its core languages C#, F#, and Visual Basic.NET to create console app barebones that work (roughly) the same. You can choose between requiring a .NET SDK installed on your system to execute them, or to have everything packed in a file or folder.
Through various ways, .NET allows for modifying your console app beyond the code that it works on (which we will cover later).
.*proj file
C#, F#, and Visual Basic.NET applications and libraries are realized as projects. The information about a project is stored in its project file. Depending on the language you use, those project file are either ending with .csproj, .fsproj, or .vbproj as file extension. These files are based on the XML standard and thus can be easily read and edited by developers themselves without the need of other tools to alter them.
The minimum project file for an F# console app:
<Project Sdk="Microsoft.NET.Sdk">
  <PropertyGroup>                               <!--Contains all properties of the project-->
    <OutputType>Exe</OutputType>                <!--If this is not `Exe`, it won't be built into an executable file-->
    <TargetFramework>net6.0</TargetFramework>   <!--The framework version the project shall be based upon-->
  </PropertyGroup>
  <ItemGroup>                                   <!--Contains all files to be compiled when building the project, in chronological order-->
    <Compile Include="Program.fs" />
  </ItemGroup>
</Project>
Program.fs file
Every new console app starts with a "Program.fs" source file which only consists of a "Hello From F#" print command.
Of course you don't need to stick with this. You can rename this file and change the code as you like but you have to make sure that there's at least 1 source file present to be compiled.
It's important to know that when executing your app, the function called last will be the starting point of your program. In earlier versions of .NET, the compiler needed a starting point specified and it had to be a function itself (most often titled "main") but since .NET 6 this is not true anymore. Though, you can still use the "main function" approach.
The starting Program.fs in .NET 6:
// For more information see https://aka.ms/fsharp-console-apps
printfn "Hello from F#"
The starting Program.fs in .NET 5 and earlier:
// Learn more about F# at http://docs.microsoft.com/dotnet/fsharp

open System

// Define a function to construct a message to print
let from whom =
    sprintf "from %s" whom

[<EntryPoint>]
let main argv =
    let message = from "F#" // Call the function
    printfn "Hello world %s" message
    0 // return an integer exit code
As you can see, in .NET 5 and earlier the starting point is specified via the [<EntryPoint>] attribute. The argv parameter will be the arguments put behind the call of the executable in the CLI. Since this is not done per se in .NET 6, you need to capture it via a System.Console method:
The starting Program.fs in .NET 6 with inclusion and usage of the input arguments:
let userInput =
    let args = System.Environment.GetCommandLineArgs()      // first argument will always be the filepath to the executable
    Array.skip 1 args

printfn "Hello from F# with userInput: %A" userInput
The starting Program.fs in .NET 5 and earlier with usage of the input arguments:
open System

let from whom =
    sprintf "from %s" whom

[<EntryPoint>]
let main argv =     // `argv` will always exclude the filepath to the executable
    let message = from "F#"
    printfn "Hello %s with userInput: %A" message argv
    0
Both apps will result in the following output when calling them:
PS C:\testFolder\minimumConsoleAppNet6\bin\Debug\net6.0\win-x64\publish> .\minimumConsoleAppNet6.exe Hello, too!

PS C:\testFolder\minimumConsoleAppNet5\bin\Debug\net5.0\win-x64\publish> .\minimumConsoleAppNet5.exe Hello, too!

# output:
Hello from F# with userInput: [|"Hello"; "too!"|]
Framework-dependent vs. self-contained
As written before, it is your choice of what is to be required when executing your console app. When deploying framework-dependent, the runtime (i.e. the .NET SDK) must be installed for your app to be executable. When deploying self-contained, the runtime is already packed into your app. Both options have their (dis)advantages: In a framework-dependent scenario, the user might need to install the .NET SDK on his device before being able to use your program. This can be annoying for the users of your app, depending on if they work with the .NET framework regularly or having nothing to do with it.
Self-contained executables need more space since they pack the runtime into them (hence the name). This also leads to the problem that the runtime is device-dependent: The .NET SDK for Linux differs from that for Windows which differs from that for MacOS, meaning that you must choose for which operating system (OS) you want to deploy your tool.
In the project file, the deployment type is written into the property group. If you choose self-contained, you need to specify the target runtime:
<Project Sdk="Microsoft.NET.Sdk">

  <PropertyGroup>
    <OutputType>Exe</OutputType>
    <TargetFramework>net6.0</TargetFramework>
    <SelfContained>true</SelfContained>                 <!--If this is set to false or is absent, deployment type will be framework-dependent-->
    <RuntimeIdentifier>win-x64</RuntimeIdentifier>      <!--The OS your app shall run on-->
  </PropertyGroup>

  <ItemGroup>
    <Compile Include="Program.fs" />
  </ItemGroup>

</Project>
For a list of runtimes you can deploy to, look here.
Single file vs. folder
Default is that your console app will be deployed as an executable file inside a folder with all libraries and other files needed for the execution. Sometimes, especially when you don't have an installer for your application (which will mostly be the case) or you don't want your app users to handle ZIP archives, it might be a good choice to use single file-deployment. In that case, the whole folder content will be packed into a single file which itself will serve as an archive that gets extracted
- into the user's temp folder at runtime and then executed (.NET 5).
- directly into the memory and then executed (.NET 6).
Using the single file deployment comes at the cost of a slightly slower startup time due to the extraction process.

Our minimum console app in its extracted state (.NET 5).
This is what our project file for single file deployment would look like:
<Project Sdk="Microsoft.NET.Sdk">

  <PropertyGroup>
    <OutputType>Exe</OutputType>
    <TargetFramework>net6.0</TargetFramework>
    <PublishSingleFile>true</PublishSingleFile>                             <!--If this is set to false or is absent, deployment type will be folder-->
    <IncludeAllContentForSelfExtract>true</IncludeAllContentForSelfExtract> <!--Only needed in .NET versions below 6 to generate "real" single files-->
    <RuntimeIdentifier>win-x64</RuntimeIdentifier>                          <!--`<SelfContained>` is missing, since `<PublishSingleFile>` sets this to true, but the runtime identifier is still needed-->
  </PropertyGroup>

  <ItemGroup>
    <Compile Include="Program.fs" />
  </ItemGroup>

</Project>
Unfortunately, even for our small example app (which does nothing else than printing a single string), the required space is quite large (~ 65 MB). This is due to the large .NET SDK runtime shipped. Luckily, there are some features we can use to decrease the file size:
<Project Sdk="Microsoft.NET.Sdk">

  <PropertyGroup>
    <OutputType>Exe</OutputType>
    <TargetFramework>net6.0</TargetFramework>
    <PublishSingleFile>true</PublishSingleFile>
    <RuntimeIdentifier>win-x64</RuntimeIdentifier>
    <EnableCompressionInSingleFile>true</EnableCompressionInSingleFile>     <!--Applies compression like in ZIP archives-->
    <PublishTrimmed>true</PublishTrimmed>                                   <!--Checks during compiletime (into CIL) for unused core libraries and classes and excludes them-->
  </PropertyGroup>

  <ItemGroup>
    <Compile Include="Program.fs" />
  </ItemGroup>

</Project>
<EnableCompression> decreases file size by about 50 %. This comes at the cost of a higher startup time.
<PublishTrimmed> decreases file size depending on the number of unused libraries and classes but compiletime is noticeably increased. Since this feature is still in beta stage, it is possible that the resulting app does not start or fails under special circumstances, though this seems rarely to be the case (I personally never encountered it).
There are a lot (!) of different properties you can set in your project file. I won't cover all of them here, but here are a few other things that might be important to you:
<Project Sdk="Microsoft.NET.Sdk">

  <PropertyGroup>
    <OutputType>Exe</OutputType>
    <TargetFramework>net6.0</TargetFramework>
    <PublishSingleFile>true</PublishSingleFile>
    <RuntimeIdentifier>win-x64</RuntimeIdentifier>
    <CultureInvariant>true</CultureInvariant>       <!--Depending on the regional settings of your system, you might get problems with different signs (`,`, `.`, and so on)-->
                                                    <!--Due to this, it is best practice to set `<CultureInvariant>` to true, so that you don't have to expect parsing errors-->
    <InvariantGlobalization>true</InvariantGlobalization>   <!--Comparable to the setting above-->
    <ServerGarbageCollection>true</ServerGarbageCollection>     <!--Important to set this to true if you don't want to expect performance problems due to garbage collection-->
    <Version>0.0.1</Version>                    <!--There are 3 version settings: `<Version>`, `AssemblyVersion>, and `FileVersion`. `<Version>` is an informal version tag of your application-->
    <AssemblyVersion>0.0.1.0</AssemblyVersion>  <!--`<AssemblyVersion>` is the version tag that you can access to while using your app via `System.Reflection.Assembly.GetExecutingAssembly()`-->
    <FileVersion>0.0.1.0</FileVersion>          <!--This is the version tag that you can see when rightclicking on your app and looking at the properties. It defaults to 1.0.0.0-->
                                                <!--Keep in mind that the versioning follows the `(Major).(Minor).(Build).(Revision)` pattern (except `<Version>` tag)-->

  </PropertyGroup>

  <ItemGroup>
    <Compile Include="Program.fs" />
  </ItemGroup>

</Project>
How to create an F# console app in .NET
There are several ways to start a console app written in F#. As prerequisite you need to have the .NET SDK installed.
Via .NET CLI
With the .NET SDK installed, you already are able to create a console app barebone into your folder with any CLI using the following command:
dotnet new console -lang "F#" --framework net6.0 # or any other .NET version you want to use
You can also specify an output path (-o [yourPath]) and a name (-n [desiredName]).
The console app will consist of the project file (as seen above) and the Program.fs file.
Via Visual Studio
Open a new Visual Studio instance:

Select F# Console Application. If not present, filter for F# language.
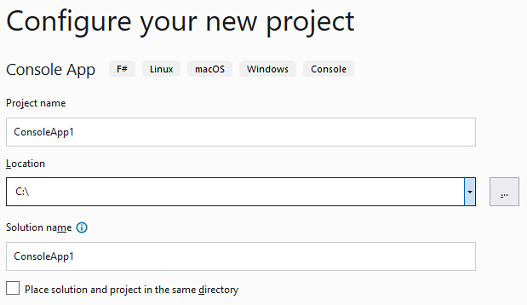
Choose name and location of your console app.

Choose your target .NET version.
Building vs. publishing
When creating a file from the project, MSBuild (the Microsoft Build Engine) takes the information from the project file to determine what and how to build. But you are not restricted to that. Most of the MSBuild information can be given directly when deploying the app (see below).
As compiling methods you can choose between building and publishing. When building, all files and dependencies get compiled and an executable will be created. When publishing, building will be executed but on top it will be taken into account that the result shall be used as a whole (in the shape of a file or a folder), thus putting everything together and making it deployable. For normal, you build libraries to use them and build console apps to test them but you publish console apps when you want to distribute them. Since publishing is special to apps in general (but not to libraries), we will focus on it in the following.
Via .NET CLI
Using a CLI, publishing your project works as follows:
dotnet publish
when executed in the folder where project file is located, otherwise the path to the project file containing folder or to the project file itself must be given:
dotnet publish C:\testFolder\minimumConsoleAppNet6
dotnet publish C:\testFolder\minimumConsoleAppNet6\minimumConsoleAppNet6.fsproj

# relative paths are possible too
As written earlier, you can give a lot of arguments into MSBuild, e.g.:
dotnet publish -o [path]                        # output directory
dotnet publish -f [framework]                   # target framework, e.g. `net6.0`
dotnet publish -r [rID]                         # target runtime, `[rID]` being the runtime identifier, as seen in the project file above
dotnet publish --self-contained [true]/[false]
dotnet publish -p:[propName]=[value]            # `[propName]` is the name of the property you want to set, [value] the value you want to set it to, e.g.
dotnet publish -p:PublishSingleFile=true
For a full list of commands, look here.
Via FAKE
FAKE is a nice tool that aids with automatizing building, publishing and deploying. It also allows to chain Unit Tests while doing so.
If you already have a FAKE build script ready, it is very easy to extend it with a publishing task:
(If not, you might want to look into the FAKE build scripts we use in our repositories)
// we start with a simple build
let publishBinariesWin = BuildTask.create "PublishBinariesWin" [clean.IfNeeded; build.IfNeeded] {
    let outputPath = sprintf "%s/win-x64" publishDir
    solutionFile
    |> DotNet.publish (fun p ->
        // and then call MSBuild to run with the arguments we parse into it:
        let standardParams = Fake.DotNet.MSBuild.CliArguments.Create ()
        {
            p with
                // set some of the properties...
                Runtime = Some "win-x64"
                Configuration = DotNet.BuildConfiguration.fromString configuration
                OutputPath = Some outputPath
                MSBuildParams = {
                    standardParams with
                        Properties = [      // here you can set all the properties that were not treated before
                            "Version", stableVersionTag
                            "Platform", "x64"
                            "PublishSingleFile", "true"
                        ]
                };
        }
    )
}
Via Visual Studio
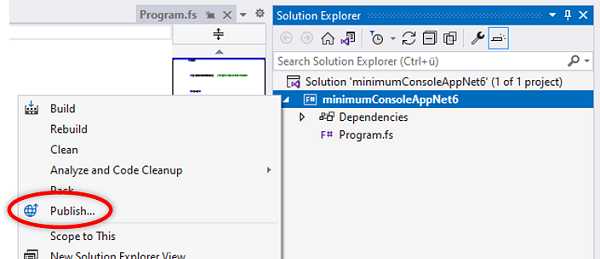
Right click on your project file in the solution explorer and choose "Publish...".
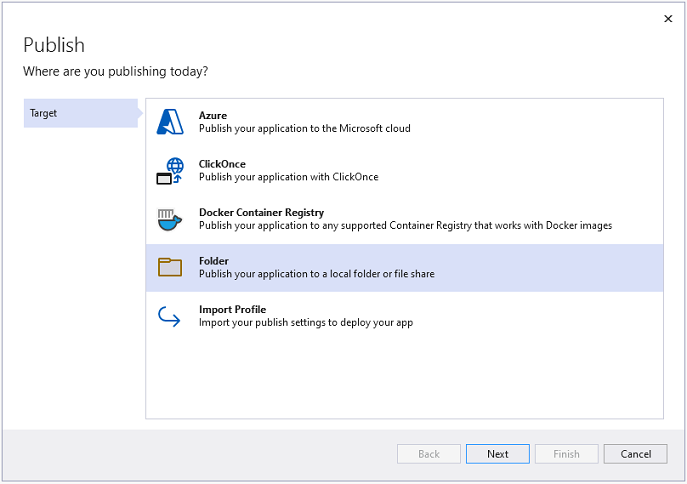
Choose your desired output target (e.g. "Folder" if you like to get your executable file in a folder).

Set the output path.

By clicking on "Show all settings" you can apply additional settings like deployment type, target runtime, etc. Finish the publishing via clicking on "Publish" at the top.
How to extend console apps
You now know how to create and deploy console apps but of course you want more than just printing Hello to the World.
The most common extension of your current console app (besides adding code) is the addition of further source files. You can either just create the file in the project folder and add it to the project file...
<Project Sdk="Microsoft.NET.Sdk">
  <PropertyGroup>
    <OutputType>Exe</OutputType>
    <TargetFramework>net6.0</TargetFramework>
  </PropertyGroup>
  <ItemGroup>
    <Compile Include="SecondSourceFile.fs" />
    <Compile Include="Program.fs" />
  </ItemGroup>
</Project>
...or use the Visual Studio interface for that:
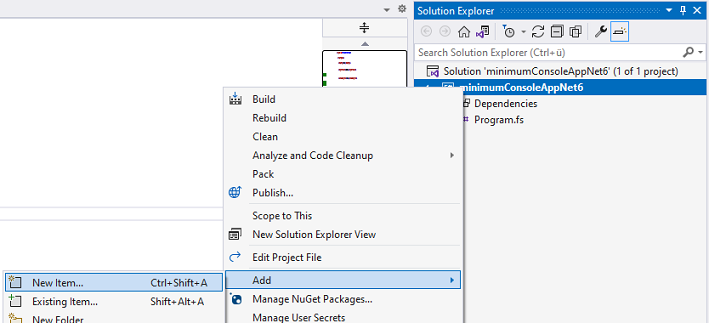
Keep in mind that your executing source file (most often Program.fs) must be at the last position!
What will also often be the case, is that you will want to use external libraries inside your tool. NuGet is the best source for that. To add a NuGet package to your app, you can either add the line for it to the project file, or use the .NET CLI or Visual Studio for doing so:
dotnet add package [packageName] # with `[packageName]` being, e.g., `FSharpAux`
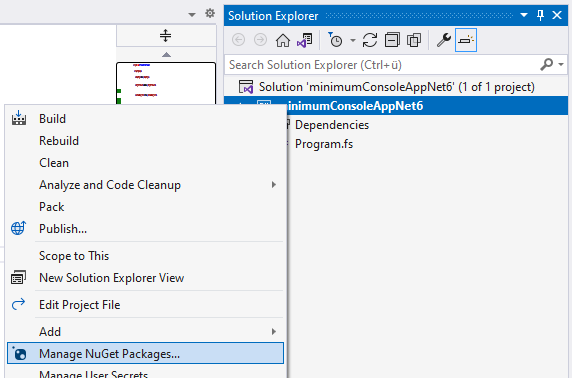

The resulting project file:
<Project Sdk="Microsoft.NET.Sdk">

  <PropertyGroup>
    <OutputType>Exe</OutputType>
    <TargetFramework>net6.0</TargetFramework>
  </PropertyGroup>

  <ItemGroup>
    <Compile Include="Program.fs" />
  </ItemGroup>

  <ItemGroup>
    <PackageReference Include="FSharpAux" Version="1.1.0" />
  </ItemGroup>

</Project>
There are a few very helpful libraries for console apps that I want to show you in the following.
Argu
Argu is a library which facilitates the creation of command-line argument parsing a lot for you. It allows you to create commands and infinitely nestable subcommands for your console app. It comes with built-in error parsing and creating a simple help-command that grows along the commands you add.
Due to its implementation in F#, it is especially simple to use in F# console apps.
#r "nuget: Argu, 6.1.1"

open Argu

// Union type for a kind of command
type MainCommands =
    // each field is a command. Specific properties are realized via attributes
    | [<CliPrefix(CliPrefix.None)>]                         PrintHWFs
    | [<CliPrefix(CliPrefix.None)>]                         PrintHWfrom     of person : string
    // the `ParseResults<yourType>` type makes subcommands possible (see below)
    | [<CliPrefix(CliPrefix.None)>][<AltCommandLine("-e")>] PrintHWextended of ParseResults<SubCommands>
    // the `IArgParserTemplates` allows for adding usage descriptions which are shown when calling `--help` or giving a wrong input argument
    interface IArgParserTemplate with
        member this.Usage =
            match this with
            | PrintHWFs         -> "Print Hello World"
            | PrintHWfrom _     -> "Print Hello World from someone"
            | PrintHWextended _ -> "Print Hello World from someone to someone"

and SubCommands =
    | To       of person : string
    | FromTo   of sender : string * receiver : string
    interface IArgParserTemplate with
        member this.Usage =
            match this with
            | To _      -> "Receiver of the message"
            | FromTo _  -> "Sender and receiver of the message"

// initialization of the parser
let parser = ArgumentParser.Create<MainCommands>()

[<EntryPoint>]
let main argv =
    try
        // parse the user's command-line arguments
        let pr = parser.ParseCommandLine(inputs = argv, raiseOnUsage = true)
        // return the results
        let ar = pr.GetAllResults()
        // this is the actual control flow: What shall happen if the user gives what argument, what second argument, and so on
        match ar.Length with
        | 0 -> printfn "No input."
        | _ ->
            ar
            |> List.iter (
                fun r ->
                    match r with
                    | PrintHWFs         -> printfn "Hello World from F#!"
                    | PrintHWfrom p     -> printfn $"Hello World from {p}!"
                    | PrintHWextended p ->
                        p.GetAllResults()
                        |> List.iter (
                            fun r2 ->
                                match r2 with
                                | To p2             -> printfn $"Hello World from F# to {p2}!"
                                | FromTo (p2,p3)    -> printfn $"Hello World from {p2} to {p3}!"
                        )
            )
    with e -> printfn "%A" e
    0
Notable examples:
Spectre.Console
Another library extending command-line argument parsing is Spectre.Console. Compared to Argu, it is less intuitive to use in an F# project due to its object-oriented (OO) design. Aside from that, it comes with a load of extra features like table depiction, tree construction, live updates, charts, and even pixel drawings!
Setting a table:
#r "nuget: Spectre.Console, 0.43.0"
#r "nuget: FSharpAux, 1.1.0"

open System
open System.IO
open System.Threading
open Spectre.Console
open FSharpAux

[<EntryPoint>]
let main _ =

    // a test file for our purposes
    let table =
        let file = File.ReadAllLines(Path.Combine("c:", "testFolder", "table.tsv"))
        file
        |> Array.map (
            fun s -> s.Split('\t')
        )
        |> array2D

    // initialize a new table and set the border style
    let spectreTable = new Table()
    spectreTable.Border <- TableBorder.HeavyHead

    let cols = table[0,0 ..]
    let rows = table[1 ..,0 ..]

    // apply some markup to our strings
    let markupdCols = cols |> Array.map (fun s -> ($"[bold][italic]{s}[/][/]"))
    let markupdRows =
        rows
        |> Array2D.mapColI (
            fun iCol s ->
                if iCol = 4 then
                    match int s with
                    | x when x > 80     -> $"[red]{s}[/]"
                    | x when x <= 80    -> $"[green]{s}[/]"
                    | _                 -> failwith "cannot happen"
                else s
        )

    // add columns and rows to the table
    spectreTable.AddColumns(markupdCols) |> ignore
    for i = 0 to rows.GetLength(0) - 1 do
        spectreTable.AddRow(markupdRows.[i,0 ..])
        |> ignore

    spectreTable.Title <- TableTitle("Musterpeople")

    // display the table
    AnsiConsole.Write(spectreTable)
Construct a tree:
type Dir = {
    Name    : string
    Subdirs : Dir []
    Files   : FileInfo []
}

[<EntryPoint>]
let main _ =

    // special markup for special files
    let matchFileExt f =
        match f with
        | x when String.contains(".jpg") x -> $"[orange1]{f}[/]"
        | x when String.contains(".png") x -> $"[gold1]{f}[/]"
        | x when String.contains(".txt") x -> f
        | x when String.contains(".xlsx") x -> $"[green]{f}[/]"
        | x when String.contains(".pub") x -> $"[darkslategray3]{f}[/]"
        | x when String.contains(".rtf") x -> $"[blue]{f}[/]"
        | _ -> f

    let rec constructDir path = {
        Name    = (DirectoryInfo path).Name
        Files   = Directory.GetFiles(path) |> Array.map FileInfo
        Subdirs =
            Directory.GetDirectories(path)
            |> Array.map constructDir
    }

    let topDir = constructDir @"C:\testFolder\testDir"

    // add a node with every new file and folder but only check folders for files and subfolders
    let rec addNode (node : TreeNode) dir =
        dir.Subdirs |> Array.map (fun di -> addNode (node.AddNode(di.Name)) di) |> ignore
        dir.Files |> Array.map (fun fi -> node.AddNode(fi.Name |> matchFileExt)) |> ignore
        node

    // initialize tree and style it
    let root = Tree(topDir.Name)
    root.Style <- Style(Color.Red1)
    root.Guide <- TreeGuide.Line
    // add the nodes
    root.AddNodes(topDir.Files |> Array.map (fun fi -> fi.Name |> matchFileExt))
    topDir.Subdirs
    |> Array.map (
        fun di ->
            addNode (root.AddNode(di.Name)) di
    )
    |> ignore

    AnsiConsole.Write(root)
Building a Bar Chart:
[<EntryPoint>]
let main _ =

    let noOfContributionsIn2021 =
        [|("muehlhaus", 158); ("geodels", 0); ("MikhayN", 0); ("HLWeil", 463);
        ("ZimmerD", 273); ("kMutagene", 1858); ("bvenn", 260); ("Etschbeijer", 0);
        ("bellacapilla", 0); ("Joott", 754); ("Freymaurer", 710); ("SchuckL", 0);
        ("omaus", 609); ("ZimmerA", 352); ("LibraChris", 121); ("CMR248", 122);
        ("JessicaFaryadMarani", 0); ("zieglerSe", 18); ("Falkenei", 7);
        ("vLeidel", 0)|]
        |> Array.filter (fun (person,conts) -> conts > 0)
        |> Array.sortByDescending snd

    let colors = [|
        Color.Red
        Color.Gold1
        Color.Lime
        Color.Yellow
        Color.Blue
        Color.Fuchsia
        Color.Silver
        Color.Teal
        Color.Olive
        Color.Maroon
        Color.White
        Color.LightSteelBlue1
        Color.LightPink1
        Color.Green
        Color.Aqua
    |]

    let rnd = Random()

    // initialize bar chart with style
    let barChart = BarChart()
    barChart.Width <- 100
    barChart.Label <- "[underline]No. of GitHub contributions (in 2021)[/]"
    barChart.CenterLabel() |> ignore

    // add a bar with a new color (and make sure the color is unique)
    let rec addWithColor i usedColors =
        let color = colors |> Array.shuffleFisherYates rnd |> Array.head
        let cond1 = i < noOfContributionsIn2021.Length
        let cond2 = List.contains color usedColors
        if cond1 && not cond2 then
            barChart.AddItem(
                noOfContributionsIn2021[i] |> fst,
                noOfContributionsIn2021[i] |> snd |> float,
                color
            )
            |> ignore
            addWithColor (i + 1) (color :: usedColors)
        elif List.contains color usedColors then
            addWithColor i usedColors

    addWithColor 0 []

    AnsiConsole.Write(barChart)
(Re)Drawing a picture:
#r "nuget: System.Drawing.Common, 6.0.0"

[<EntryPoint>]
let main _ =

    let bm = new System.Drawing.Bitmap(@"C:\testFolder\testDir\sp.png")

    let xMax = bm.Width - 1
    let yMax = bm.Height - 1

    // initialize a canvas with width and height
    let cnvs = Canvas(xMax + 1,yMax + 1)

    for y = 0 to yMax do
        for x = 0 to xMax do
            let px = bm.GetPixel(x,y)
            let col = Color(px.R, px.G, px.B)
            // set pixel after pixel for our picture
            cnvs.SetPixel(x,y,col)
            |> ignore

    AnsiConsole.Write(cnvs)
    Console.WriteLine()
Starting a live update:
[<EntryPoint>]
let main _ =

    // initialize a status report
    AnsiConsole.Status().Start(
        // first message
        "Initiating looong list...",
        fun stCtxt ->
            // do our stuff
            List.init 100000000 id |> ignore
            // update message after task is done
            stCtxt.Status <- "Done."
            Thread.Sleep(1000)
    )
ConsoleToolMenu
A library written by myself that shall provide a simple text-based interface. Its purpose lies especially in offering easy-to-create menu-like structures via the creation of Options that can be infinitely nested and assembled with actions that get called when choosing a bullet point.
open ConsoleToolMenu
open ConsoleToolMenu.Functions

// initialize the options you want to have
let options = [|
    // each option consists of a name and an action that gets triggered when the option is chosen
    Option.create "Option 1" (fun _ -> printfn "Option 1 was chosen")
    Option.create "Option 2" (fun _ -> printfn "Option 2 was chosen")
    // options can serve as folders, inhabiting other options
    Option.createFolder
        "Option 3"
        (fun _ -> printfn "Option 3 was chosen")
        (Array.map2
            Option.create
            [|"SubOption1"; "SubOption2"|]
            [|(fun _ -> printfn "SubOption 1 was chosen"); fun _ -> printfn "SubOption 2 was chosen"|]
        )
    Option.createFolder
        "Option 4"
        (fun _ -> ())
        [|Option.createFolder
            "SubOption 1b" (fun () -> ()) [|
                Option.create "SubSubOption 1" (fun _ -> printfn "SubSubOption 1 chosen")
            |]
        |]
|]

// choose the look of your cursor
let cursor = SelectionPointer.create '>'

// add messages for start and end
let startMsg = "Hello there"
let endMsg = "Goodbye there"
// start the menu. Use Up and Down arrow keys, and Enter and Escape to navigate
start cursor startMsg endMsg options
NLog
Logging is an important part of any bigger application. It makes debugging and app usage documentation much easier and logging libraries also often offer customization of the console appearance to some extent.
One of the largest logging libraries in the .NET ecosystem is NLog. It allows for writing to several targets (files and the console itself, e.g.) and can be customized via an XML-settings file or directly in code.
Like Spectre.Console, it is a C# library which means we have to use it in an OO way.
#r "nuget: NLog, 4.7.13"

open System.IO
open NLog
open NLog.Config
open NLog.Targets
open NLog.Conditions

// we start with initializing the base config object which can be modified
let config = new LoggingConfiguration()

// we initialize the first console target
let consoleTarget1 = new ColoredConsoleTarget("console")
// and set its layout to a new one we created. The string is parsed internally similar to how interpolated strings work
let layoutConsole1 = new Layouts.SimpleLayout(@"${message} ${exception}")
consoleTarget1.Layout <- layoutConsole1

// a second target that differs from the first one
let consoleTarget2 = new ColoredConsoleTarget("console")
let layoutConsole2 = new Layouts.SimpleLayout(@"${level:uppercase=true} ${message} ${exception}")
consoleTarget2.Layout <- layoutConsole2

// a file target, for writing into a text file
let fileTarget = new FileTarget("file")
let folderPath = Path.Combine("C:", "testFolder", "minimumConsoleAppNet6")
// we set filename and layout for the file target
let fileName = new Layouts.SimpleLayout(Path.Combine (folderPath, @"minimumConsoleAppNet6.log"))
let layoutFile = new Layouts.SimpleLayout("${longdate} ${level:uppercase=true} ${message} ${exception}")
fileTarget.FileName <- fileName
fileTarget.Layout <- layoutFile

// the targets are added to the config object
config.AddTarget(consoleTarget1)
config.AddTarget(consoleTarget2)
config.AddTarget(fileTarget)

// we define rules for colors that shall differ from the default color theme (which is black background, grey font)
let warnColorRule = new ConsoleRowHighlightingRule()
warnColorRule.Condition <- ConditionParser.ParseExpression("level == LogLevel.Warn")
warnColorRule.ForegroundColor <- ConsoleOutputColor.Yellow
let errorColorRule = new ConsoleRowHighlightingRule()
errorColorRule.Condition <- ConditionParser.ParseExpression("level == LogLevel.Error")
errorColorRule.ForegroundColor <- ConsoleOutputColor.Red
let fatalColorRule = new ConsoleRowHighlightingRule()
fatalColorRule.Condition <- ConditionParser.ParseExpression("level == LogLevel.Fatal")
fatalColorRule.ForegroundColor <- ConsoleOutputColor.Red
fatalColorRule.BackgroundColor <- ConsoleOutputColor.DarkYellow

// now we add the newly defined rules to the console target
consoleTarget2.RowHighlightingRules.Add(warnColorRule)
consoleTarget2.RowHighlightingRules.Add(errorColorRule)
consoleTarget2.RowHighlightingRules.Add(fatalColorRule)

// we declare which message of a log level goes to which target
config.AddRuleForOneLevel(LogLevel.Info, consoleTarget1)
config.AddRuleForOneLevel(LogLevel.Info, fileTarget)
config.AddRuleForOneLevel(LogLevel.Trace, fileTarget) // here, we only write Trace and Debug log level into the file but don't show them in the console
config.AddRuleForOneLevel(LogLevel.Debug, fileTarget)
config.AddRuleForOneLevel(LogLevel.Warn, consoleTarget2)
config.AddRuleForOneLevel(LogLevel.Warn, fileTarget)
config.AddRuleForOneLevel(LogLevel.Error, consoleTarget2)
config.AddRuleForOneLevel(LogLevel.Error, fileTarget)
config.AddRuleForOneLevel(LogLevel.Fatal, consoleTarget2)
config.AddRuleForOneLevel(LogLevel.Fatal, fileTarget)

// set the config for the logger
LogManager.Configuration <- config

// finally, we bind a logger of the name "NLog logger" to the name log which we will use afterwards
let log = LogManager.GetLogger("NLog logger")
Notable examples:
App conventions
Stylewise, there are a few things to know:
- When tackling the naming of commands and subcommands, try to stick closely to easy to follow names. Look at the dotnet CLI or the Git CLI for impressions
- This is especially important when designing your app API-wise
--[word]or-[letter]for argument specifiers (as in Argu!)- Not directly related to APIs, but it is common to return an exit integer:
- 0 for successfull termination
- 1 to 255 for any error
- Do this via returning the exit code as the last integer (see .NET 5 Program.fs example above) or use
System.Environment.Exit(code)
- Try to keep your executing source file (default: Program.fs) as clean as possible. Like when working with libraries, try not to pack all the code into 1 source file but instead distribute it according to functionality into modules and classes within respective source files
Data folders
The following does not solely apply to console apps but to all applications in general:
More complex apps might need to read or save config or user-specific data. Best practice is to follow common standards for doing so, like XDG Base Directory Specification which is based on Linux or directories which is platform-independent.